XiaoMi-AI文件搜索系统
World File Search SystemButtons
x870e aorus pro ice x870e aorus pro
2-1 Installation Precautions..................................................................................... 7 2-2 Product Specifications....................................................................................... 8 2-3 Installing the CPU and CPU Cooler................................................................ 12 2-4 Installing the Memory...................................................................................... 15 2-5 Installing an Expansion Card.......................................................................... 16 2-6 Back Panel Connectors................................................................................... 17 2-7 Onboard Buttons and LEDs............................................................................ 19 2-8 Internal Connectors......................................................................................... 20

直接Marlec 2025
All the technical features and operation of the HRSi plus: • • Digital LCD displays battery Volts, charge currents and more • • Charge splitter for 2 battery banks • • Push buttons to scroll screens and amend operating parameters • • Allows connection to remote display • • Automatic detection for 12V or 24V operation • • Reprogrammable for use with other battery types with non standard voltage settings (with the Marlec programming cable) • • Dims: 193 x 127 x 40mm••重量:0.42kg

AeroCruze 230 高级触摸屏,2 轴或 3 轴自动驾驶仪
AeroCruze 230 自动驾驶仪由自动驾驶仪面板上的一组混合控件操作,使用双同心旋钮、软按钮、触摸屏显示器以及一组专用控件。专用旋钮/按钮功能专为频繁使用的功能而设计。自动驾驶仪触摸屏按钮控制一般功能的启用/禁用,并控制横向和垂直模式。面板软触摸上/下按钮控制空速/垂直速度目标、俯仰参考和 ALT 模式下的精细高度调整。高度选择旋钮用于预选所需高度。
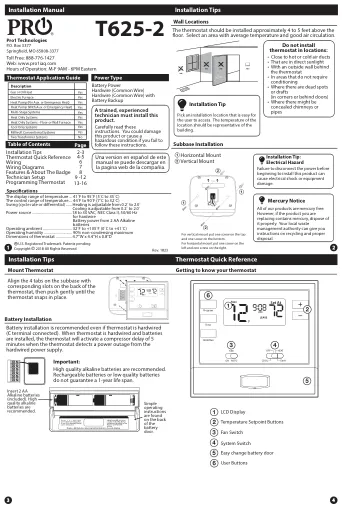
T625-2-安装手册
当AA电池电源较低时,将显示低电池图标。Whenever the thermostat detects low battery voltage from the AA batteries, the low battery icon will begin flashing on the screen ftor 21 days (if the batteries are not changed).If the batteries are not changed 22 days after the thermostat detects low battery voltage, the thermostat screen will only show the flashing battery icon until buttons are pressed.If the batteries are not changed 43 days after the thermostat detects low battery voltage, the thermostat screen will only show the flashing battery icon until buttons are pressed and the set points will offset to 85°F/29°C in cooling and 55°F/13°C in heating.在此阶段,可以暂时进行设定点更改,但是设定点将在4小时后变回默认值。恒温器将继续执行低电池闪烁,温度偏移状态,直到达到内部电压阈值。当达到恒温器内部电压阈值时,将打开所有继电器,并且恒温器将无法操作,直到安装新电池为止。
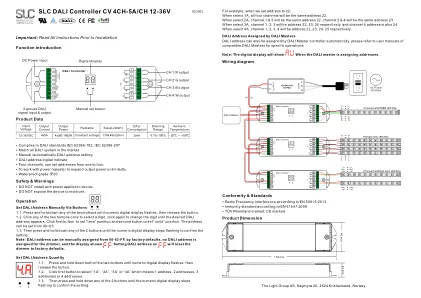
SLC DALI控制器CV 4CH-5A/CH 12-36V
通过按钮1.1手动设置Dali地址。按并按住两个按钮中的任何一个,直到数字显示器闪烁,然后释放按钮。1.2。单击两个按钮中的任何一个以选择一个数字,再次单击以更改数字,直到出现所需的dali地址为止。单击第一个按钮以设置“ TENS”位置和第二个按钮以设置“单位”位置。地址可以从00〜63设置。1.3。然后按下并按住两个按钮中的任何一个,直到数字数字显示停止闪烁以确认设置为止。注意:Dali地址可以从00-63-FF手动分配,通过出厂默认值,未为调光师分配Dali地址,并且显示显示。将DALI地址设置为将调光器重置为出厂默认值。
更多关于 PowerPoint 书籍工作的内容,请参阅第 72,73 页,填空。
1. 操作按钮位于形状下拉菜单中。T 2. 主页选项卡上媒体组中的音频和视频按钮。F 3. 在幻灯片中插入音频时,会出现声音图标。T 4. 您只能向幻灯片上的文本和对象添加一个动画。F 5. 普通视图是用于创建和设计幻灯片的主要编辑视图

iBTW41 在线 IB draftv3.ai
1. 按住位于设备背面的时间设置按钮 2 秒钟,直到时钟显示屏闪烁并发出哔声。 2. 按 – 或 + 按钮将时钟调整为当前时间(按住可快速设置)。确保设置正确的 AM/PM 时间。PM 指示器出现在显示屏左侧;没有 AM 指示器。 3. 要在标准 12 小时制和 24 小时(“军用”)时间显示之间切换时钟显示,请在时间设置期间显示屏闪烁时按下闹钟或闹钟按钮。 4. 按下并释放时间设置按钮以确认当前时间设置。年份将在显示屏上闪烁。按 – 或 + 按钮设置正确的年份。 5. 按下并释放时间设置按钮以确认当前年份设置。月份将在显示屏上闪烁。按 – 或 + 按钮设置正确的月份。 6. 按下并释放时间设置按钮以确认当前月份设置。显示屏上会闪烁日期。按 – 或 + 按钮设置正确的日期。7. 按下并释放时间设置按钮以确认设置。将发出 2 声哔声,表示时间设置模式已完成。

用户手册
Safe Working Load (SWL): 205 kg (451 lbs) Weight of unit: Total weight of unit: 44,5 kg/98 lbs Chassis: 17 kg/37,5 lbs Lifting column: 19 kg/41,9 lbs Leg support: 3,5 kg/7,7 lbs 4-point lifting arm: 5 kg/11 lbs Battery: SLA 24V 2.9 Ah LiFePO4 25.6V 2.4 Ah电池充电器:输入:100-240 VAC,50-60 Hz,最大0.35 A输出:29.4 VDC,0,5电池充电时间:5小时额定额定性能:100个吊头:75千克和500mm起重速度:35mm/秒/秒/秒(1,4英寸/秒)(1,4英寸/秒)(1,4英寸/秒),载荷(165 lbs)(165 lbs)(165 lbs)加载保护级别:IP24(IP24)。Ocject,12.5mmØ的探针球不得完全穿透。从任何方向上溅到围栏的水不应没有有害影响。Operating forces button: Buttons on control panel: < 5 N Buttons on handset: < 5 N Material: Aluminum, Plastic, steel Motor: Lifting motor: 24 V DC Leg spreading motor: 24 V DC Turning diameter: 1144 mm / 1300 mm (45 3 / 64 in) / (51 3 / 16 in) Expected Lifetime: The lifter and accessories has an expected lifetime of 30 000 cycles or 10 years.应用零件:吊带脚休息摇臂柄